8.5 KiB
Using the Synchronization Client
navigating, usage
The ownCloud Desktop Client remains in the background and is visible as an icon in the system tray (Windows, KDE), status bar (Mac OS X), or notification area (Linux).
![]()
The status indicator uses overlay icons to indicate the current status of your synchronization. The green circle with the white checkmark tells you that your synchronization is current and you are connected to your ownCloud server.
![]()
The blue icon with the white semi-circles means synchronization is in progress.
![]()
The yellow overlay icon with the parallel lines tells you your synchronization has been paused. (Most likely by you.)
![]()
The gray icon with three white dots means your sync client has lost its connection with your ownCloud server.
![]()
When you see a white circle with the letter "i" that is the informational icon, so you should click it to see what it has to tell you.
![]()
The red circle with the white "x" indicates a configuration error, such as an incorrect login or server URL.
Using the Right-Click Menu
A right-click on the icon opens a menu for quick access to multiple operations.
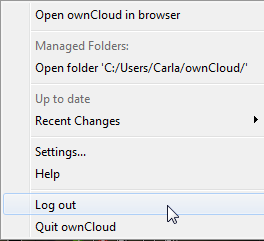
The Desktop Client menu provides the following options:
- Open ownCloud in browser
- Open folder [your local sync folder]
- Up to date
- Recent changes
- Settings
- Help
- Log out
- Quit ownCloud
Using the Account Settings Window
account settings, user, password, Server URL
Click Settings in the right-click menu to see a summary of your ownCloud account settings, or left-click your systray icon. This shows which ownCloud account you are connected to (or accounts, if you have more than one) your quota status, and a window for managing your synchronization settings.
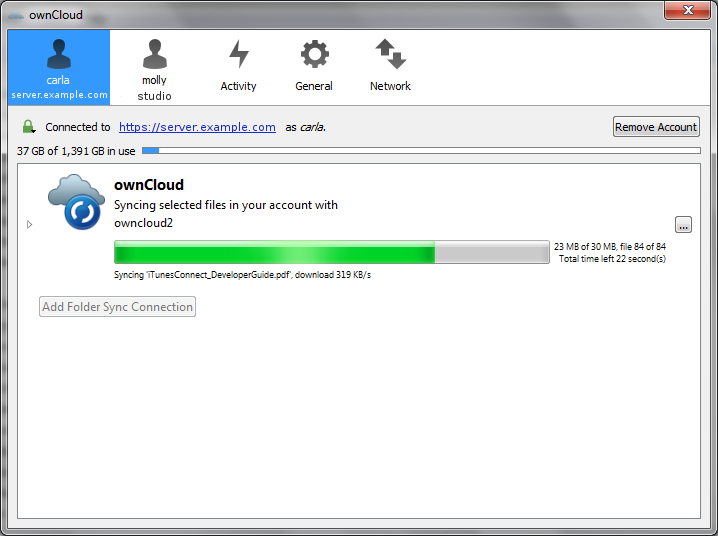
At the top of the window are tabs for each configured sync account, and three others for Activity, General and Network settings. On your account tabs you have the following features:
- Connection status, showing which ownCloud server you are connected to, and your ownCloud username.
- A Remove Account button, which deletes your account but does not delete your data files.
- Used and available space on the server.
- Current synchronization status.
- Add Folder Sync Connection button, which is active only when you have removed synchronization on an account (see Remove Sync below).
The little button with three dots that sits to the right of the sync status bar offers four additional options:
- Open Folder
- Choose What to Sync
- Pause Sync / Resume Sync
- Remove Sync
Open Folder opens a file explorer window displaying the client-side folder that is being synced.
Choose What to Sync opens the folder sync tree view. From there you can choose to sync all or only some of the folders in the folder tree.
Pause Sync pauses sync operations for just this folder sync connection without making any changes to your account. Resume Sync resumes sync operations for this folder sync connection.
Remove Sync removes this folder sync connection without removing the account. If you want to synchronize the folder tree again then click the Add Folder Sync Connection button, and re-select the folder tree that you want to sync.

The Activity window contains the log of your recent activities, including files downloaded and deleted, and which local folders your files went into.
The General window has configuration options such as Launch on System Startup, Use Monochrome Icons, and Show Desktop Notifications. This is where you will find the Edit Ignored Files button, to launch the ignored files editor, and two new features: Ask confirmation before downloading folders larger than [folder size], and Add an Account.
Multi-Account Support
You may now configure multiple ownCloud accounts in your desktop sync client. Simply click the Add an Account button on the General tab, and follow the account creation wizard. The new account will appear as a new tab in the settings dialog, where you can adjust its settings at any time.
Editing Ignored Files
The Ignored Files Editor can be opened by clicking on the button in
the General tab of the settings dialog. The settings apply to all
configured accounts. The Ignored Files Editor provides a list of files
that are ignored (that is, not synchronized) by the client and server
during synchronizations. You may add additional files or directories
that you want to exclude from the synchronization process. In addition
to using standard characters, the Ignored Files Editor enables you to
use wild cards (for example, using an asterisk ‘*’ to indicate multiple
characters or a question mark ‘?’ to indicate a single character).
For additional information see Using the Ignored Files Editor
Using the Network Window
proxy settings, SOCKS, bandwith, throttling, limiting
The Network settings window enables you to define network proxy settings, and also to limit download and upload bandwidth. New to version 2.0 is the option for automatic bandwidth limits.

Using the Ignored Files Editor
ignored files, exclude files, pattern
You might have some local files or directories that you do not want to backup and store on the server. To identify and exclude these files or directories, you can use the Ignored Files Editor.
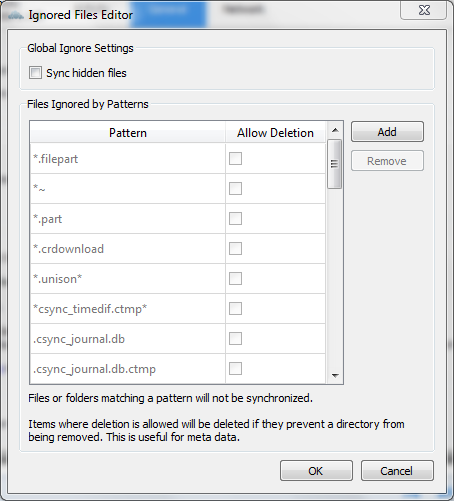
For your convenience, the editor is pre-populated with a default list
of typical ignore patterns. These patterns are contained in a system
file (typically sync-exclude.lst) located in the ownCloud
Client application directory. You cannot modify these pre-populated
patterns directly from the editor. However, if necessary, you can hover
over any pattern in the list to show the path and filename associated
with that pattern, locate the file, and edit the
sync-exclude.lst file.
Note
Modifying the global exclude definition file might render the client unusable or result in undesired behavior.
Each line in the editor contains an ignore pattern string. When
creating custom patterns, in addition to being able to use normal
characters to define an ignore pattern, you can use wildcards characters
for matching values. As an example, you can use an asterisk
(*) to identify an arbitrary number of characters or a
question mark (?) to identify a single character.
Patterns that end with a slash character (/) are applied
to only directory components of the path being checked.
Note
Custom entries are currently not validated for syntactical correctness by the editor, so you will not see any warnings for bad syntax. If your synchronization does not work as you expected, check your syntax.
Each pattern string in the list is preceded by a checkbox. When the check box contains a check mark, in addition to ignoring the file or directory component matched by the pattern, any matched files are also deemed "fleeting metadata" and removed by the client.
In addition to excluding files and directories that use patterns defined in this list:
- The ownCloud Client always excludes files containing characters that cannot be synchronized to other file systems.
- Files are removed that cause individual errors three times during a synchronization. However, the client provides the option of retrying a synchronization three additional times on files that produce errors.
For more detailed information see ignored-files-label.