|
|
||
|---|---|---|
| figs | ||
| misc | ||
| .gitignore | ||
| CDN.md | ||
| CDN.ru.md | ||
| customgeo.dat | ||
| Dockerfile | ||
| ex.sh | ||
| HiddifyNG.en.md | ||
| LICENSE | ||
| Nekoray.ru.md | ||
| nginx.conf | ||
| README.md | ||
| README.ru.md | ||
| Streisand.md | ||
| Streisand.ru.md | ||
| template_config_client.jsonc | ||
| template_config_client_cdn.jsonc | ||
| template_config_server.jsonc | ||
| template_site4cdn.conf | ||
| V2RayA.ru.md | ||
| V2RayN.ru.md | ||
| V2RayNG.ru.md | ||
easy-xray
Script for Linux which makes XRay management easy
Readme in Russian (todo) Readme in Chinese
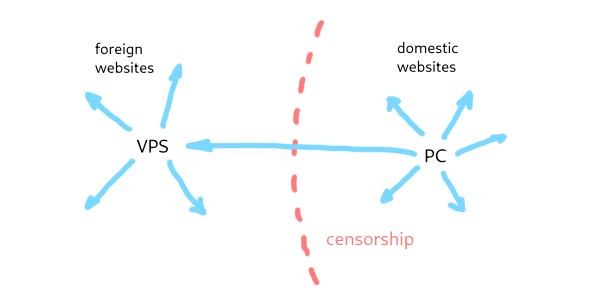
XRay (aka ProjectX) is a frontier solution to circumvent the internet censorship. XRay allows to guide traffic through a server (VPS) outside the region of censorship as a proxie, but connection to xray server looks for authorities as a typical connection to a regular website. Attempts to detect VPN such as active probing or blocking by the rule "all except https" are eliminated by XRay. Also, XRay server can be configured to open only foreign websites, thus preventing detection by the code on domestic websites. As a proxy, XRay has no need to encrypt already encrypted https traffic, hence CPU load is low. XRay doesn't need to keep the connection alive, and users don't need to manually reconnect to it time-to-time. Also users don't need to turn a client off to go to most domestic websites.
Besides of its plusses, configuration and management of XRay server is quite sophisticated. So, here is a script which helps to do it. It can
- install/upgrade/remove XRay
- generate credentials and server/client configs
- add/delete users to the configs
- and more
How to use on VPS
Linux
First you need a Linux server (VPS) with jq and openssl installed, they can be found in repositories of
almost all popular Linux distributions. Then download whole easy-xray folder to the VPS, make the script ex.sh executable, and run a
desired command with it. Use ./ex.sh help to see the list of all available commands and ./ex.sh install to start interactive prompt
that installs and configures XRay. Do not use easy-xray for user root, use usual user and sudo instead.
chmod +x ex.sh
./ex.sh help
sudo ./ex.sh install
Now you have conf folder with server and client configs and some user configs. Server config is properly installed and XRay is running.
Time to share configs or links with users! To generate config in the link form, use ./ex.sh link user_config_file.json.
If your VPS have both IPv4 and IPv6 addressess, easy-xray can be configured such that IPv6 address is used for access with grpc-tls protocol via CDN (e.g. Cloudflare). See CDN instruction for details.
Docker
Script ex.sh is written without Docker in mind, but can be used with Docker. Download easy-xray folder (main branch) and build the
Docker image from Dockerfile with some tag name (-t, say ximage):
curl -L https://codeload.github.com/EvgenyNerush/easy-xray/tar.gz/main | tar -xz
cd easy-xray-main # note `-main` !!
docker build -t ximage ./
Usually user applications are not allowed to bind port 1024 and below, and to mimic a real website xray server should be on ports 80 and 443. Thus allow user applications to use ports from 80 and above:
sudo sysctl -w net.ipv4.ip_unprivileged_port_start=80
Enable linger mode that allows a not-logged user to run long-running services. Otherwise container can come to improper state after your logout:
sudo loginctl enable-linger your_username
Then run docker container in interactive mode (-i -t) exposing ports 80 and 443 to the ports of the host:
docker run -it --name xcontainer -p 80:80 -p 443:443 ximage
In the shell of the container install and configure xray. Ignore all warnings about systemd and don't copy configs and don't restart xray. Start xray with generated server config explicitly:
./ex.sh install
xray -c conf/config_server.json
Detach from the container with Ctrl+p then Ctrl+q. If you need to attach container again, use docker attach xcontainer with Ctrl+c to
stop xray running, or use docker exec -it xcontainer bash. To copy config files from the container to the host, first get container Id:
docker ps -a
docker cp 123abc456def:/easy-xray/conf ./
Command ./ex.sh link conf_file can be used on any conputer there config files are stored.
Clients
Linux
XRay itself can be a client, besides plenty of GUI clients that are available for Linux (Nekoray, v2rayA,..) and other popular operating
systems (see below). You can manually install XRay with official script and manually copy
customgeo.dat to /usr/local/share/xray/ or just install xray and customgeo file with sudo ./ex.sh install command. Then, copy client
config from the server and run:
sudo cp config_client_username.json /usr/local/etc/xray/config.json
sudo systemctl start xray
or
sudo xray run -c config_client_username.json
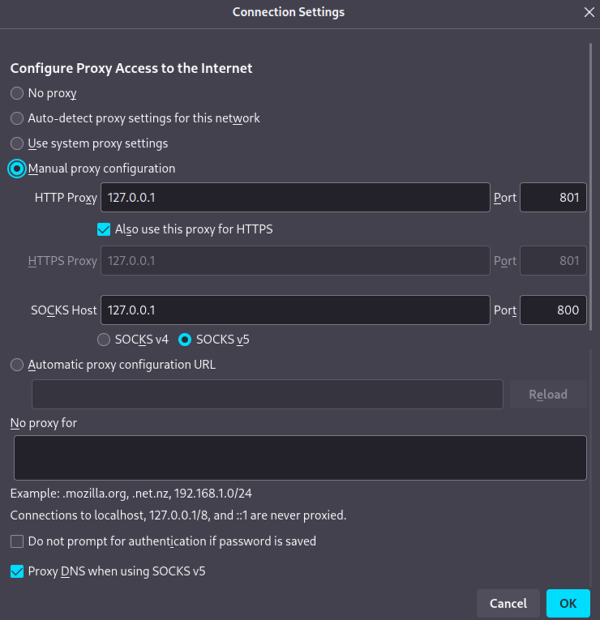
In the current configuration, on the client side XRay creates http/https and socks5 proxies on your PC which can be used by your Telegram app or Web browser like this:
To check that traffic to domestic and foreing sites goes by different ways, visit, for example, whatismyip.com and 2ip.ru. They should show different IP addressess.
Windows
For Windows GUI clients such as v2rayN, v2rayA or nekoray (nekobox) can be used.
V2rayN releases can be found here. Download asset with core,
say v2rayN-With-Core.zip, unzip, then start. Here is a graphical instruction for v2rayN (in Russian).
Detailed instruction for v2rayA can be found here (in Russian). For short, v2rayA creates a server, and its interface is available at localhost:2017 in the browser.
Nekoray (nekobox) releases can be found on this
page. Choose one of Assets, for instance nekoray-3.26-2023-12-09-windows64.zip, download
then unzip it and run Nekoray. Here is a graphical instruction (in Russian). Try TUN regime in the case of problems; use
task manager to kill it.
MacOS
Use XRay:
brew install xray
cp customgeo.dat /usr/local/share/xray/ # not yet tested
sudo xray -config=config_client_username.json
As alternative, GUI app v2rayA can be used. It creates a server, and its interface is available at localhost:2017 in the browser. Instructions can be found here (in Russian).
Android
For many mobile applications it is enough to paste a client config in a link form from the buffer, and add customgeo in an appropriate form
(see misc dir) to somethere like Settings/Routing/Custom rules/Direct URL. Tested applications are listed below.
Use V2RayNG, HiddifyNG or Hiddify Next. They are very similar to each other, here are some instructions for V2RayNG (RU) and HiddifyNG (EN).
iOS
Use Streisand. Its configuration is very similar to that of V2Ray and Hiddify, here is the instruction for Streisand.
OpenWRT
Use v2rayA. Detailed instruction can be found here (in Russian).
Others
Here you can find an additional list of clients.
Tor
Most of GUI clients are based on xray core, but do not fully support its configuration, that is crutial for Tor. To use TorBrowser in this case, use bridges. To turn on a bridge, go to Settings/Connection, then to Bridges section and choose a built-in obfs4 bridge.
Bittorrent
Bittorent protocol is blocked in the current configuration. Using bittorent on a VPS can lead to a ban from VPS provider.
What else
Hints
To choose a good serverName (your VPS will mimic this website), you can use RealiTLScanner. This
tool scans ip addresses near your server (do it not from your VPS!) and show names found at port 443. With nmap -T4 hostname you can check
that only ports 80 and 443 are open on hosts of the found websites (as in the configurations of template configs). It is also good to move
ssh on your VPS to a port beyond 1024. It can be done in /etc/ssh/sshd_config. Check twice that VPS is available at your new port before
you comment Port 22!
#Port 22
Port 43210
Links
Template configs contain comments and links and are a good start to find another interesting Xray configuration options.
See this link for details on how customgeo files are generated.
This article (in Russian) helped me to install XRay for the first time.
The template configs are based on these gRPC and XTLS examples.
XRay config reference is brilliant and helped me much.

